Create a Containerized Go Development Environment in Docker
— Tutorial, Go, Golang, Go Development, Docker, Containerization — 9 min read
I'm Brett Fullam, a creative technologist turned networking and cybersecurity specialist passionate about security automation. In this blog post, I'm going to show you how I created a custom "containerized" Go development environment in Docker that can be up and running in seconds.
The best part of the Go development environment we'll create is that you can use your local IDE of choice (in my case VScode) to interact with it, where the code you develop is saved to a shared local directory on the host operating system.

Why Docker and not a VM?
In the past, I would spin up a dedicated virtual machine to build a customized development environment using VMware or VirtualBox. While this solution works, it's not always the best choice for performance reasons.
VM's are slow to build, and they take time to spin up or shut down. Even switching back and forth between the host operating system and the VM is not the most seamless of experiences.
This is exactly why a "containerized" solution in docker is a solid choice for setting up a development environment. It starts up in seconds, and there's an overall performance boost as well. I was blown away by how fast a custom containerized Go development environment was to get up and running.
With the process I'll be showing you in this tutorial, you could create custom "containerized" development environments other than Go to create a library of custom Docker images to choose from depending on your project needs.
No GUI access needed
That's right. We won't need GUI access to the Go development environment that is running inside our Docker container, or waste any additional time configuring another IDE inside of it like you would have to do if you were using a virtual machine. We can access the Go development environment using a terminal session, and code with our local IDE.
Docker
For those of you unfamiliar with Docker, this is an excellent project to get you started. We'll only be using a few basic Docker commands, and installing Docker is a snap.
Installation
If you don't already have Docker installed, I recommend you go to Docker.com, and follow their recommended installation documentation for your operating system.
Once Docker is installed, open up a terminal, and let's confirm that it's been installed and running.
docker --versionIf it's running, you should see the version details in the terminal. At the time this blog post was written, the most current Docker version was:
Docker version 20.10.11, build dea9396If not, find and launch Docker Desktop on your host environment. While you can launch Docker from the terminal, it's quite complicated and not recommended.
Grab a copy of Ubuntu's Official Docker Image
Once Docker is up and running, we'll need to get a Ubuntu's official Docker image from Docker Hub using the following command:
docker pull ubuntuOnce it's complete, let's go check it out in our local docker image repository using the following command to list all of the images in our local image repository:
docker images -aYou should see something like the following output:

We'll use this image to create our custom Docker image with our Go development environment.
Create the base Docker container running Ubuntu
We'll use the docker run command to start a new container using the ubuntu image we just downloaded.
docker run -t -i ubuntu /bin/bashThis command creates a container and immediately opens a Linux root bash.

If you didn't notice, our Ubuntu instance was up and running in our container immediately ... no waiting for loading, and yes, it’s really a full fledged linux machine!
Let's have a look at the file system and list the directories by using the "ls" command:
ls

Now let's confirm the Ubuntu version of our system
cat /etc/os-releaseYou should see the following details about the container in the output returned:

At the time this blog post was written, the latest version of Ubuntu was "Ubuntu 20.04.3".
PLEASE NOTE ... If you exit this prompt you will be back in your local operating system, and you will have to repeat these steps to get your system up and running again.
However, we can save our changes to the Docker image by using the docker commit command which we'll do in the next section.
Customize our Ubuntu container for Go development
Now that we have a Ubuntu container up and running, it's time to start customizing it for Go development.
Before we do that, let's run apt-get update to make sure our Ubuntu image is up to date:
apt-get updateOnce that finishes, let's navigate to the /home directory
cd /homeCreate the shared directory
In the /home directory, create a folder called "gocode"
mkdir gocodeThe "gocode" directory will handle 2 things for us. First, we're going to be storing our go apps inside of it. Second, we're also going to use this directory as our shared directory with the local host operating system.
Having the same directory store our apps, and serve as the shared directory solves a couple issues for us. Go needs to have a defined path to where our Go apps will reside, and we want to be able to edit these same apps with our locally hosted IDE. Anything that's stored in the /gocode directory will be accessible by the local system and it will "persist". Typically, when a container is stopped, nothing is saved and everything is destroyed. By having a shared directory, not only will all of our Go apps will be saved on the local system, we'll be able to edit them in our local IDE as well! It's win win.
Install Nano and wget
We'll need to use a few tools to help with the installation. WGET will help us download the GO tar.gz package, and NANO will allow us to add some extra lines of code to the .bashrc file to get GO up and running.
Install wget
You will be asked to confirm "yes/no" during this installation. Go ahead and answer "y" for yes.)
apt-get install wgetInstall nano
Vim is already installed on the Ubuntu image, and your certainly welcome to use that if you prefer. However, I've found Nano to be a little more user friendly for less experienced developers.
apt-get install nanoDownload and install Go
Now it's time to download the tar.gz package for Go from the Go Downloads page.
Locate the Linux taz.gz file under "Feature downloads", and copy the link address for the package.
Make sure you're still in the /home directory of our Ubuntu container. You can use the "pwd" (print working directory) command to confirm it.
pwdNow, using wget, let's download the Go package to the /home directory of our Ubuntu container
wget https://go.dev/dl/go1.17.5.linux-amd64.tar.gzNext, we need to unzip the tar.gz package. The "-C /usr/local" changes the directory where the tar command will put the extracted output to the /usr/local directory which is where local binaries are located.
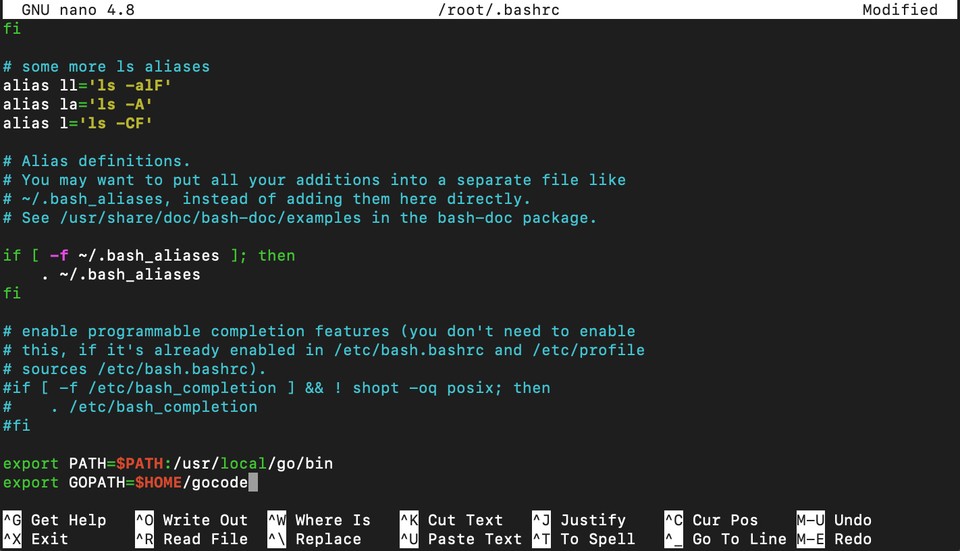
tar -C /usr/local -xzf go1.17.5.linux-amd64.tar.gzOnce that's finished, we'll need to add the $PATH and $GOPATH environment variables in the .bashrc using a text editor (in this case we'll be using nano)
Open the .bashrc file in nano
nano ~/.bashrcOnce the .bashrc file is open, go all the way to the bottom of the file and add the following lines:
export PATH=$PATH:/usr/local/go/binexport GOPATH=$HOME/gocode

To save the changes to .bashrc and exit nano:
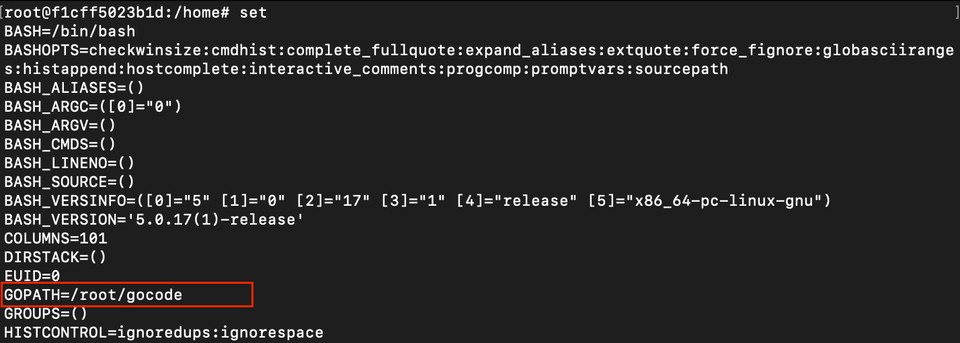
CTRL + OCTRL + XLet's check to make sure our settings to the .bashrc file are correct by using the set command.
set

You should see output similar to this. What we're looking for here is that $GOPATH is present and you should see "$GOPATH/root/gocode".
Once the $PATH and $GOPATH variables are updated, we can confirm that Go is working with the following command
go versionIf we were successful, it should return the following

PLEASE NOTE ... If you exit this prompt you will be back in your local operating system, and you will have to repeat these steps up to this point to get your system up and running again.
Save our Ubuntu image with Go now pre-installed
Now, we're ready to save all of these changes to our Ubuntu image by using the docker commit command. Do not exit out of the docker container prompt. If you do, you'll have to repeat all of the steps up to this point.
Before we can commit any of our changes, we'll need some information associated with our running Ubuntu container.
In order to do this, we'll need to open a SEPARATE terminal window on you local host. All of the commands that follow happen in this new-separate terminal, and not in our running container's terminal.
The container's terminal needs to stay open and running, so do not exit out of that prompt.
First, in the new terminal window on our local host, we need to see the information about our running container by using the docker ps -a command:
docker ps -a

We'll need the "container ID" from the terminal output, and we'll need to create a "tag" name for our modified image. Here's how the docker commit command is structured:
docker commit <running container id> <tag name of our new image>Let's fill it in with our container ID and tag name information:
docker commit 0d5905d92325 ubuntu_goOnce the docker commit command is finished you should be presented with a sha256 sum of the new image which also serves as it's "image ID" number.
Let's confirm that the custom image has been saved by using the docker images -a command
docker images -a

You should see your new custom image listed in the output. If you notice the "image ID" column only shows a part of the sha256 value we were presented with when the image was saved. If you use the docker image inspect command you can see the full sha256 "image ID" value in the json output returned by the command:
docker image inspect <image name>
docker image inspect ubuntu_goWe're all set! All of the changes we made to the Ubuntu image up to this point have been saved to our new docker image "ubuntu_go", and you now can exit out of the Ubuntu container's prompt.
Using our Ubuntu Go Development container
Finally, we're at a point where we're ready to fire up our new container for Go development.
Docker clean up
First things first. We'll need to do a little clean up, by removing the container we used to create our custom image. Run the docker ps -a command to see all running (and stopped) containers.
docker ps -a

Leave this output up, and look for the "NAME" column. We'll need that to be able to remove this exited container from the list using the docker rm -f command
docker rm -f <container "NAME"> docker rm -f tender_turingIf done correctly, it will no longer appear in the list when you run the docker ps -a command to view the running-stopped containers
docker ps -aCreate a container using our new Docker image
Now we're ready to create a container based on our modified Ubuntu Go Development image, and to take it up a notch, we're going to add a shared volume on the local host.
First, create a directory on your local host where you want to store your go apps that we'll be developing.
Next we're going to use the following docker command to perform the following actions:
- name the new container
- set the environment variable for the HOST_IP address
- mount the volume using the file path to the shared directory on the local host and where it maps to in the container's file system
- tell it which image to use
- have it return a command prompt on the container
On Mac:
IMPORTANT ... you will need to update "user" with your actual username listed in the file path.
Tip: You can use the "pwd" command from inside of the folder you create on the local host to get this information.
docker run \ --name golangDev \ -e HOST_IP=$(ifconfig en0 | awk '/ *inet /{print $2}') \ -v /Users/user/Documents/PROJECTS/golang/Docker-Ubuntu/docker-go-apps:/home/gocode \ -t -i \ ubuntu_go /bin/bashOn PC:
Windows OS (from docker CLI powershell)
Tip: You'll need to manually change your IP address to match your local dev machine.
docker run ` --name golangDev ` -e HOST_IP=192.168.1.166 ` -v //c/Users/user/Workspaces/docker-go-apps:/home/gocode ` -t -i ` ubuntu_go /bin/bashOnce you edit the details to match your local system, copy and paste the entire command into the terminal.
Upon successful completion you should be presented with a Linux root bash similar to this "root@f18e7e4eefc5:/#".
Confirm our Ubuntu Go Development Environment is good to go
First, navigate to the /home directory and confirm that the "gocode" folder is present.
cd /home
lsIf you didn't erase it, the tar.gz file we downloaded should still be there too.
Now, let's check our environment variables using the set command
setYou should see "GOPATH=/root/gocode", and now "HOST_IP" with an ip address that matches the host system.
Let's confirm that Go is installed and ready using the go version command.
go version

If successful, this command should return output similar to this "go version go1.17.5 linux/amd64".
Persistence and local IDE editing
Now, this is where the magic happens! The environment is good to go (no pun intended), but we have one last important item to go over. The shared directory. In the following steps, I will show you how to use this to edit code locally, and then run it inside of the Ubuntu Go Development container.
On the local host, go to the directory you indicated to be shared with the container.
On the local host, using any IDE of your choice create a document called hello.go inside of the shared directory.
Paste the following code into the hello.go document and make sure it's saved into the shared directory on the host.
1package main2
3import (4 "fmt"5)6
7func main() {8 fmt.Println("Hello, Go Developers!")9}- Go back to the terminal with your running Ubuntu Go container and navigate to the /home/gocode directory and list it's contents
cd /gocode
lsYou should see the hello.go document we created in our local IDE! Use the cat command to read the content of hello.go.
cat hello.go

Now we can develop our Go code in our local IDE, hit save and that same code is ready-accessible for us to run in our Ubuntu Go container.
GO Develop
All that's left is to run some simple Go commands to confirm that everything's working properly. Let's run hello.go
go run hello.go

That's it! We now have a "containerized" Go development environment that we can launch in seconds, write and edit code using a local IDE, run it inside of a docker container, and have any edits-code persist thanks to our shared directory.
Once it's up and running, you can install any packages, experiment, and break things all without damaging your local system. What's even better is that the development environment is reset every time you run a new container with our ubuntu_go image.
I hope you've enjoyed this tutorial and good luck!